Modest but Defined: Create Shape Without Tight Clothes

IG: lauralabee
Okay ladies, grab a coffee or a matcha or whatever your current fixation is, because today we need to talk about something that has literally been driving me crazy for years.
Finding that perfect balance in outfits. You know exactly what I mean right? That weird middle ground where you want to look like you actually have a body under your clothes, but you also really don’t want to wear something super skin-tight.
Before we dive in, here’s my current styling playlist. Hit play, let the vibes flow, and let’s get into it!
So picture this. It was a couple of months ago, and I was going out to dinner for my friend Sarah’s birthday. I bought this dress online that looked absolutely stunning on the model. But when I put it on? Oh boy. It was one of those stretchy bodycon things that hugged literally every single millimeter of my skin. I wore it anyway because I was out of time. Big mistake. We went to this amazing Italian place, and I spent the entire evening doing the “stand and pull” maneuver. You know the one. Where you stand up and immediately have to tug your dress down and adjust the waist because it rode up while you were sitting. I couldn’t even enjoy my garlic bread because I was so hyper-aware of how tight everything felt. I just felt so exposed and uncomfortable the whole night.
I came home, took it off, threw on my biggest, baggiest sweatpants and thought to myself – there has to be a better way. I want to look put together. I want a defined waist. But I refuse to hold my breath for four hours straight ever again.
And honestly? There is a better way. You can totally create a gorgeous, defined silhouette without feeling like a stuffed sausage. It’s all about playing with proportions and optical illusions. And I’m gonna show you exactly how I do it now. It’s super easy once you get the hang of it, I promise.
1. The Magic of Structured Shoulders
Okay, hear me out on this one because I know “shoulder pads” sounds like we are going back to the 80s. But I’m not talking about those massive linebacker shoulders.
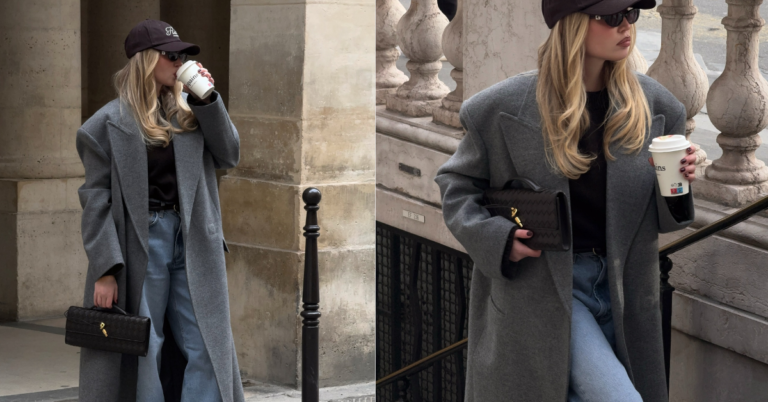
If you add just a little bit of structure to your upper half, it naturally makes your waist look smaller by comparison. It’s basic geometry. When I figured this out, my entire wardrobe changed. You can wear a totally relaxed, loose-fitting pair of trousers, but if you throw on a slightly boxy blazer with a structured shoulder over a basic tee, suddenly you have an hourglass shape. The jacket isn’t tight at all, but the shape is doing the work for you.
Try looking for blazers or even just structured cardigans that have a clean line on the shoulder. If you pair that with a high-waisted pant, you are golden. It gives off major cool-girl energy while being ridiculously comfortable.
2. The Rule of Thirds (My Holy Grail)
If you take away anything from this post today, let it be this. Do not cut your body in half visually. A 50/50 split makes everyone look kind of boxy.
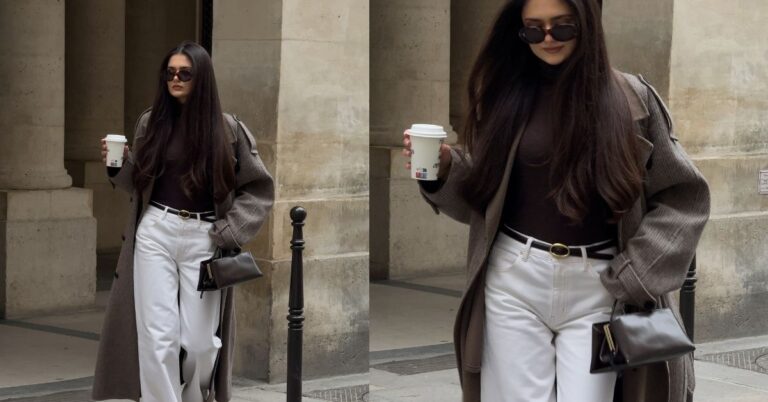
Instead, we are doing the rule of thirds. Think of your outfit as sections. You want either one third on top and two thirds on the bottom, or vice versa. The easiest way to do this? High-waisted everything. High-waisted wide-leg pants are literally the best invention of our generation.
When you wear a pant that hits right at your natural waist (the smallest part of your torso), and you tuck in your shirt, you instantly have shape. The pants can be flowy and wide and super modest, and the shirt can be a relaxed button-down. But because you tucked it in at that specific point, you created a waistline. No tight spandex required.
Here is a really quick visual guide on how different tucks completely change your outfit. I found this video so helpful when I was trying to figure this out!
3. Strategic Layering and Open Jackets
This is my favorite trick for those days when I really just want to wear a baggy shirt and loose pants but still look like I tried.
So, a few weeks ago I was having one of those “I hate everything in my closet” mornings. I was wearing loose linen pants and a slightly oversized white t-shirt. I looked like a square. But then I grabbed this long, open trench coat I thrifted last year. I left the coat completely unbuttoned.
What happens is, the open jacket creates two vertical lines down the front of your body. This frames your outfit and instantly makes you look longer and leaner. Your clothes underneath aren’t tight, but the framing gives your body definition. You can do this with long cardigans, duster coats, or an unbuttoned shirt worn over another top. It’s such a simple optical illusion but it works every single time.
4. A-Line is Your Best Friend
Let’s talk about dresses and skirts. Bodycon is out (at least for me, lol). A-line is forever.
An A-line dress fits gently around the top and then flares out from the waist down. It gives you that beautiful, feminine silhouette without clinging to your stomach or hips. It’s exactly what it sounds like – it creates the shape of an “A”.
When you wear an A-line skirt, you don’t even have to try. The garment itself has the shape built into it. I love pairing a midi-length A-line skirt with a slightly cropped sweater. And by cropped, I don’t mean showing your belly! I mean a sweater that ends exactly where the skirt begins. This defines your waist perfectly without anything grabbing at you.
5. The Art of the Belt
We need to discuss belts. I feel like we all got traumatized by those massive, wide elastic belts from the early 2010s that we used to put over literal t-shirts. Yeah, let’s not do that again.
But a good, classic leather belt is a game changer. If you are wearing a flowy midi dress that feels a bit like a tent, just add a thin belt around your natural waist. You don’t have to pull it tight. Just let it rest there. It tells the eye “hey, here is where the waist is” while the fabric below flows nicely.
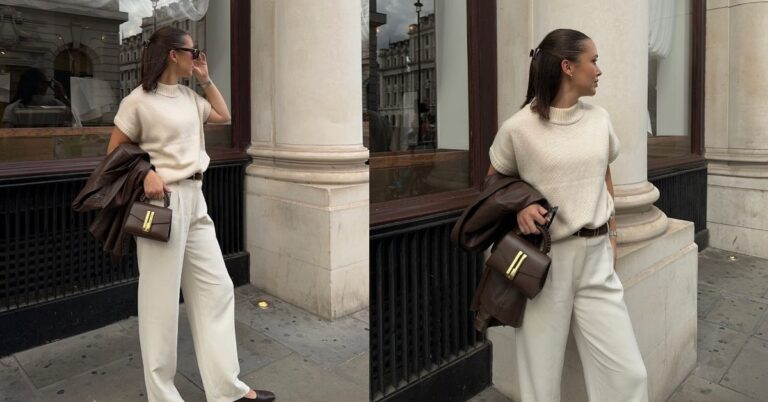
You can also belt blazers! This is such a chic look. Get an oversized blazer, cross it over, and belt it. You get the structure from the shoulders, the definition from the belt, and maximum comfort because the jacket itself is loose.
6. Fabric Matters Way More Than You Think
Okay so here is a quick story about why fabric choice is literally everything. I bought this beautiful, flowing wrap dress last summer. It was made of this super cheap, thin, static-y polyester stuff. I didn’t think much of it.
I walked outside on a slightly breezy day, and the wind just plastered this thin fabric against every single curve of my body. It was basically a second skin. So much for my modest, flowy outfit, right? I was so annoyed.
If you want clothes that drape nicely and hold their own shape instead of just molding to yours, you need slightly heavier, structured fabrics. Think thick cotton, denim, linen blends, and heavy knits. These materials stand slightly away from your body. They hide the things you want to hide, but they still look crisp and tailored. A thick denim wide-leg pant will hold its A-line shape all day long. A flimsy rayon pant will just cling to your legs. Keep that in mind next time you go shopping!
7. Color Blocking for the Win
You probably already know that dark colors are visually receding and light colors stand out. We can totally use this to our advantage.
If you want to emphasize your waist without wearing a tight top, try wearing a darker color on your bottom half (like navy or black high-waisted trousers) and a lighter color on top (like a cream blouse). The stark contrast between the two colors creates a very clear horizontal line right at your waist. Your eye is instantly drawn to that separation. It creates an incredible shape, even if both the top and bottom are relatively loose-fitting.
I do this all the time with black jeans and a white button-down. I just tuck the front in a little bit (the classic french tuck) and let the back hang loose. It is effortless, comfortable, and you look so put together.
8. Tying the Knot
No, not getting married! I mean literally tying your shirts.
If you have an oversized t-shirt or a button-down that feels a bit too boxy, just gather the extra fabric at the front or the side and tie it into a little knot. This pulls the fabric gently toward your waist, creating tension and shape, but the rest of the shirt stays relaxed. It’s a great way to take a casual outfit and give it a bit of intentional styling.
I do this a lot over slip skirts or slip dresses. A slip dress can sometimes feel a bit too clingy on its own. So I’ll throw a loose t-shirt over it and knot it at the waist. It breaks up the outfit, defines the middle, and makes the whole look way more casual and wearable for daytime.
Let’s recap this real quick
Because I know I just threw a lot of information at you!
- Embrace high waists: They are the easiest way to find your waist without squeezing it.
- Structure on top: A good shoulder line makes the rest of you look smaller.
- Use the French tuck: Let your clothes drape, but anchor them at the waist.
- Open jackets: Create those long vertical lines.
- Pick the right fabrics: Go for materials that hold their own shape and don’t cling.
Honestly, getting dressed should be fun, not a chore. And it definitely shouldn’t end with you feeling uncomfortable after eating a normal meal. You totally have the power to control how your clothes fit and how they make you feel. It just takes a little bit of playing around in front of the mirror to figure out which proportions work best for your unique body.
I challenge you to go into your closet right now. Grab that one flowy dress or those baggy pants that you never know how to style, and try one of these tricks. Throw a blazer over it, or add a belt, or try a different tuck. I swear you will be surprised by how much of a difference a tiny adjustment can make.
Fashion is just optical illusions, guys. We are basically all just playing tricks with fabric. So why not make the fabric work for us?
Just a little note - some of the links on here may be affiliate links, which means I might earn a small commission if you decide to shop through them (at no extra cost to you!). I only post content which I'm truly enthusiastic about and would suggest to others.
And as you know, I seriously love seeing your takes on the looks and ideas on here - that means the world to me! If you recreate something, please share it here in the comments or feel free to send me a pic. I'm always excited to meet y'all! ✨🤍
Xoxo Alice